Sonntag, 27. März 2011

Fleur ist nun auch ein Puschelfuss-Pferd

Heute habe ich Fleur zu Ende gehairt. Ich hatte ja schon angefangen, sie von ihrem modellierten Behang zu befreien. (Hier) Den Schweif habe ich auch etwas verlängert.
Und so sieht sie nun aus:
fleur finished

fleur finished

English Summary:
Today I haired Fleur's legs and added a bit to her tail, I am very happy with her new fuzzy-all-over looks.

Montag, 21. März 2011

Fullbody Hairing - The English Version - Part Two

3) How to do the hairing:
First you need to do some preparations both with your material and the model.
Best is to begin with the model, as you can work with your wool while it dries.

Make sure that all things you probably wanted to change about the model’s pose are done, because this can’t be changed very well once you started hairing.

Take your reference photos and paint your model accordingly. This needs not be a master piece it is just supposed to help you to know which colour of hair goes where. (It is also helpful if the covering hair gets a bit thin in one spot – if the surface is painted in about the same hue of the hair, any bare spots won’t be glaringly obvious.)

Paint the eyes and snout to detail and gloss them (if you plan to do that), because with the hair on it will get hard to do it properly without messing up the hair.
If the colours you use won’t dry to a permanently fixed state, you need to finish the model as usual (laquer, fixation, whatever you use)
Set the finished model aside and let dry for as long as you usually do with a repaint.

In the meantime, your get your hairing material and the bigger scissors out. Set up little paper bags or glasses as a container for the hair colours before you.
Then you take a strand of the first colour between thumb and index finger of the hand not holding the scissors. Let only a tiny little bit of material peek over your thumb and cut. (Not the thumb! *g*)
Like this, you chop up the whole strand (or as much as is needed of the colour to begin with). Try to cut the "hairs bits" as tiny as possible.
cutting the hair
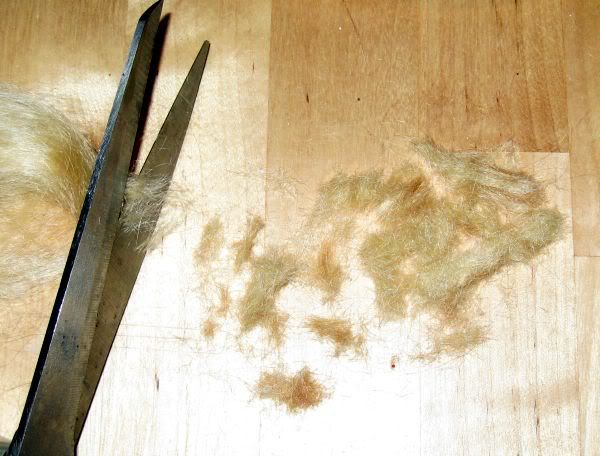
(For detailed areas like the face even smaller than this)

You might need different lengths of hair-bits, depending on where on the animal you are hairing. The face usually gets the smallest and finest hair-bits, while the fur on top of the back can be longer, sometimes up to a centimeter or more. Again, this depends on your reference photos.

Like this, you prepare all your hair colours and put the fluffy little hair-heaps into the containers, so that your work won’t be in vain in case you sneeze or there is some sudden draught.

Tip:
For areas where two colours meet, you can create shading by mixing the two colours on the table until they blend nicely.

Before your pounce on your model now, take a few moments to envision the directions that the hair on a real animal has – by following some basic rules, your animal will not look weird or scruffy just because one started at the wrong end or into the wrong direction.
Meet the dog shaped object aka “DSO” which I quickly sketched to illustrate in which directions you have to work when hairing.
hairing-how-to
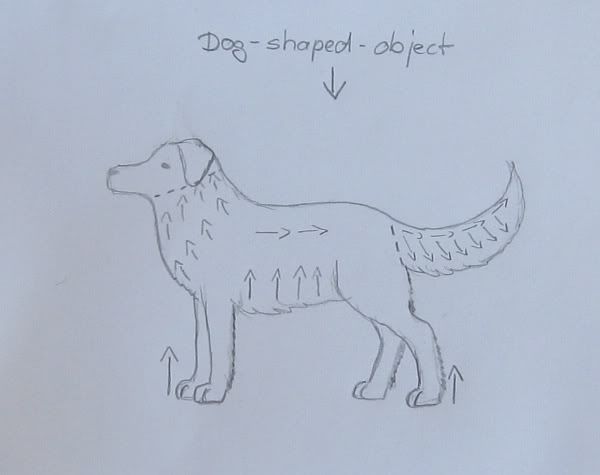
The head and the tail are divided from the body by little dotted lines, because you can do them last or first, just as you like. Leaving the tail for last does create a nice handle for your to hold the model, though.

Generally, you hair always upwards and toward the hindend.
Meaning you start at a paw and work your way up to the shoulder. Or on the body itself it means you hair from snout-end to tail-end and always always start under the animal, working your way up. (I.e. starting at the middle of the tummy and going up the side until you reach the spine)
The little arrows on DSO may help with that idea a bit.

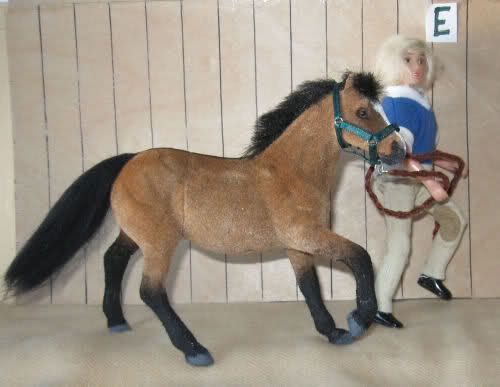
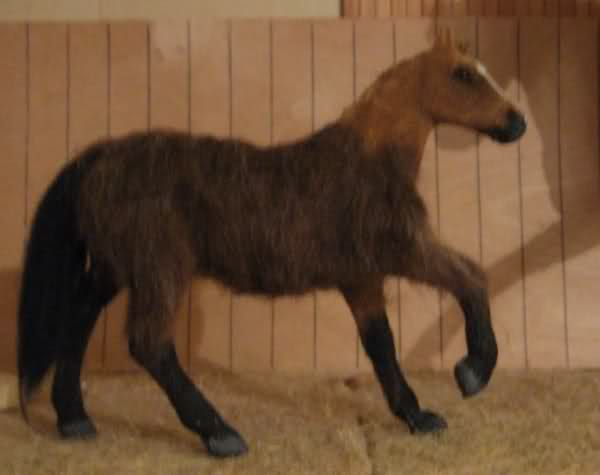
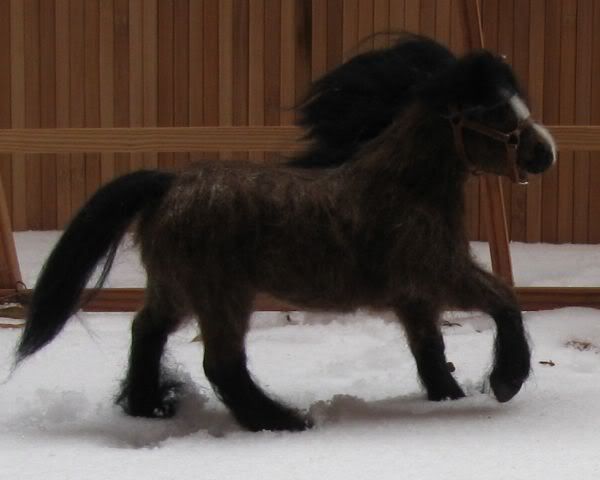
A quick transformation of the no-name pony “Brownie” into a very hairy Shetland Pony:
brownie wip

brownie wip

brownie wip

And now you finally get started!
Pick the area you want to start with and the colour(s) of hair that you need. (The head will need some precision work, so beginning on the leg might be easier)

Cover a small area with glue and then pick up some hair (Either with your fingers or with the tweezers – experience shows that you look like a werewolf in no time, no matter if you use the tweezers or not) and gently dab it onto the glue. If you still see free spaces, then dab on a bit more.

Wait a moment until the glue begins to set, then brush very lightly and gently over the haired surface. A few hairs will come off usually. Glue the next bit and add hair and so on.

When you have finished one body part, you wait a bit until the glue has fully set. Then you gently ruffle the limb/body between two fingers. (Very gently!) Usually, more little hairs will come off. If you spot a bare area now somewhere, place a drop of glue on it and dab on more hair. If all is nicely covered, you can use your small scissors to trim down the hair a bit, in case it stands up in places.
Repeat on all legs.

On the body you might want to use longer strands to create the top-coat. In any case, you do not add any of the very short hair as “undercoat”, because this would make your animal look too fat. You can use the smallest bits of hair in the middle under the tummy, though, where one often finds thin and finer hair. The rest is haired with the longer strands.

When you have finished the body, trim it with scissors until you achieve the desired outlines and surface of the hair lying on top.

The tail you start where it connects to your animal and work out toward the tailtip. Here, too, you begin on the underside of the tail working up and for a finishing touch cover the upper side with some longer hair.
Cut to trim.

If you managed to hair the face without making the eyes and snout vanish completely (if so, the little scissors help you getting them hair-free again), you might need some facial markings, like the “points” that some dogs have above the eye. Paint them onto the hair.

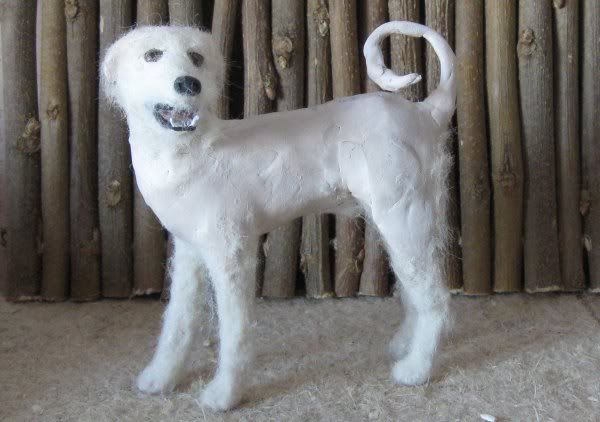
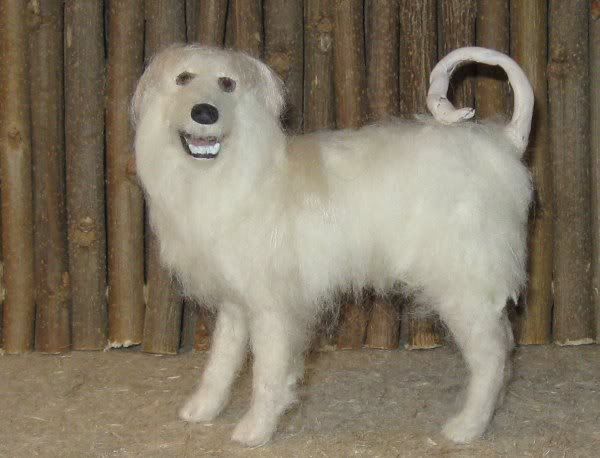
See some of the steps of hairing performed by “Abby” the Pyrenean mountain dog :
First step, getting started with the legs (I did the head before) –see how skinny he seems to be, despite the breed being a very compact dog?
hairing-how-to

Longer hair for the body and beginning to create his “beard”:
hairing-how-to

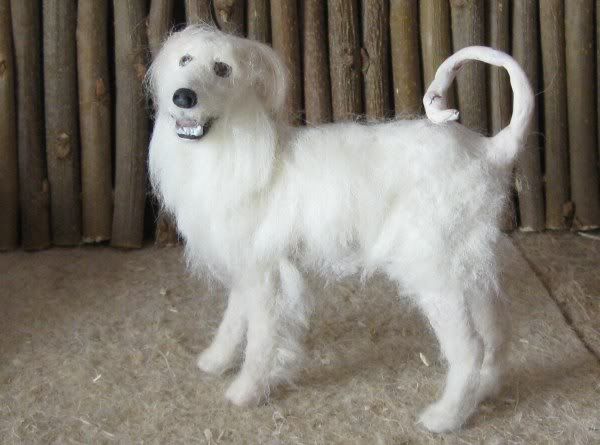
Even more longer hair:
hairing-how-to

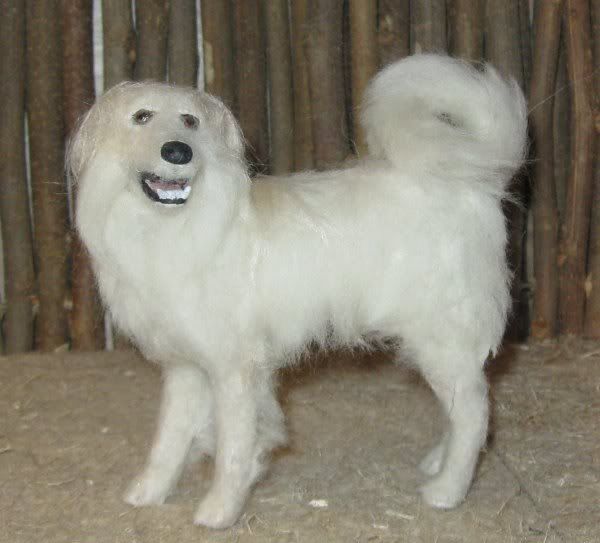
…which has now been trimmed. See also the subtle addition of a second colour above his shoulder- the breed has such markings there sometimes. He also has this colour on his ears.
hairing-how-to

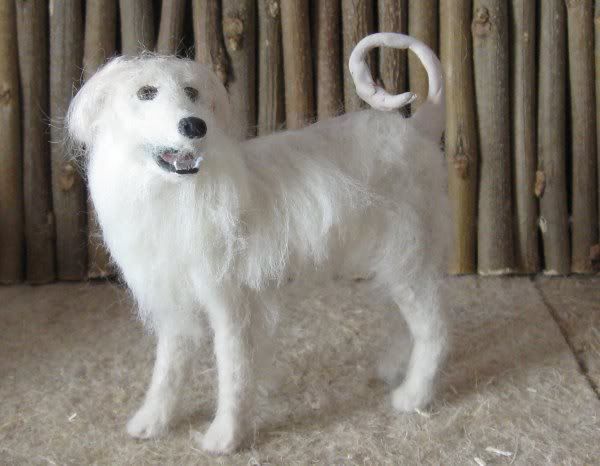
Fluffy tail in the making:
hairing-how-to

And finished:
hairing-how-to

hairing-how-to
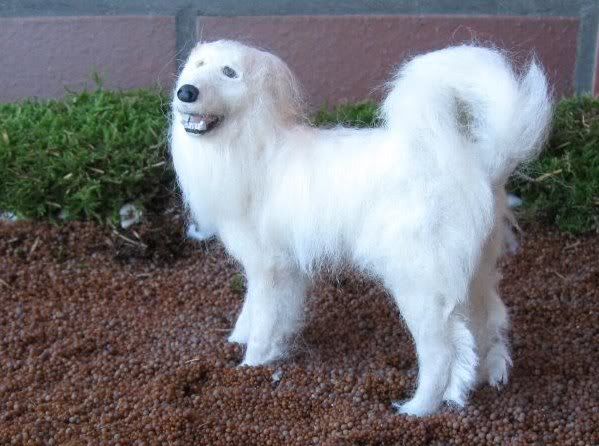
His breed also has “feathers” which have been added to his legs last.

Happy Hairings!

If you have any questions or want me to describe a step more closely, feel free to comment or email me.

Fullbody Hairing - The English Version - Part One

So here we go with the tutorial, since I know that my English language readers are waiting so much for this, I wrote it right away in English to be faster about it. I hope I did not make too many mistakes. ^-^

1) Introduction:
Hairing complete model animals is fun, but can be rather time consuming. Still the result is usually so lifelike that it was worth all the time and curses (probably) invested into the endeavour.
This method usually enhances furry companion animals and horses/ponies that are supposed to have their winter hair. You can also use this technique to create a beard on your model-riders, though.
The following two images show some examples of finished animals and also compare different materials used.
First image:
hairing-how-to
1 – Dog OSC (the very first I ever made), material used : rather coarse sheep-wool, already dyed white
2 – Schleich Shepard puppy, not altered, material used: rests of mohair
3- Dog OSC (my second one), material used: rests of mohair
4 –Dog OSC, material used: coarse sheep-wool and mohair
5 – Schleich foal, not altered, material used: rests of mohair
6 – No-name toyhorse, hooves overhauled, material used: coarse sheep-wool

Second image:
hairing-how-to
Both dogs are sculpted and haired by Juliane Garstka of Luckenbach Ranch. Material used: real fur, I think of a rabbit

2) Materials needed:
  • Reference photos
  • A model animal (Consider that hairing will make the model look thicker!)
  • Paint in the colours that you find on the animal
  • Hairing material* in the above mentioned colours which has a texture that fits the breed/condition of the animal you are remaking (coarser material for a pony in winter-fuzz, for example, finer hair for a dog that does not live outdoors)
  • Glue that dries up transparently
  • A little container for each of the hair colours (preferably not plastic, as it gets very static, glass is better, but something like a folded little paperbag does it, too.)
  • Sharp scissors, normal sized
  • A pair of small scissors, if nothingelse is available, use your nailscissors
  • Optionally a pair of tweezers
  • Time and patience, like for all remaking activities
*You can use about everything hair/wool-like
  • mohair (expensive)
  • wool from a ball of wool(split the thread to get single hairs)
  • sheep-wool (Sold like this in our hobby stores here: http://www.trolle-und-wolle.de/images/pflanzengefaerbte-maerchenwolle.jpg)
  • any other kind of wool that is not yet spun into a ball of wool
  • plush might work, too, but I haven’t tried it, yet, so don’t go and shave innocent teddy-bears and expect stellar results…

Part two follows in a moment.

Sonntag, 20. März 2011

Demnächst hier /Coming soon

Ich habe endlich mit der Anleitung zum Hairen angefangen.
Finally I started with the tutorial for complete hairing of model animals.
Demnächst mehr / soon more about that:

announcement

Samstag, 19. März 2011

Hyacinth - bessere Bilder

Soo, nun Tageslicht Bilder von heute morgen. So sieht die Farbe wirklich aus:
Here we have daylight pictures from this morning, this is the true colour:

hyacinth wip

hyacinth wip

hyacinth wip

Freitag, 18. März 2011

Hyacinth in Arbeit

Im letzten Post zu Hyacinth war sie ja noch recht einfarbig. Mittlerweile hat sie eine Äpfelung bekommen:
hyacinth wip
hyacinth wip
Die Äpfelung wurde dann abgeschächt, bis sie nur noch ganz leicht im Fell zusehen ist.
Auf dem Bild von heute sieht man das gut, allerdings stimmt es farblich nicht, sie sieht viel dunkler aus als sie ist:
hyacinth wip

Dieses Bild von letzter Woche kommt ihr farblich viel näher:
hyacinth wip

English Summary:
In her last entry, Hyacinth look pretty simple-bay still, in the meantime I have done some dappling on her. Shown above in the stage where I painted the "net" of the dapples onto her basic colour and then below when I have blended the dappling into the surrounding colour, because I want them to be very light and subtle.
The image second to last is of today but not very true to colour, as it was taken just now. The older image that I posted again as the last picture is much closer to her true hue of bay.

Donnerstag, 17. März 2011

Projekt Percy 7

Bevor ich krank wurde, hatte ich die meisten Modellierarbeiten an Percy fertig und habe ihn einmal Schwarz angemalt, um zusehen, wie er nun wirkt:
Percy in Arbeit

Percy in Arbeit

Im Moment bin ich dabei ihn abzuschleifen, eine Seite ist fast fertig. Und ich füge noch ein paar kleine Details hinzu, zum Beispiel am Maul oder den Ohren.
percy wip

English Summary:
Before I got sick, I had finished all major resculpting on Percy and gave him a quick layer of black to have a glimpse on what he will be like when finished. Currently I am at sanding him all over and adding some little details as on his snout or ears. One side of him is almost done with sanding, I hope to progress this weekend.

Dienstag, 15. März 2011

Fleurs Überraschung

Jedes Jahr im Frühling schaue ich mir meinen alten Custs besonders genau an, um zu sehen ob sich im Winter Spannungsrisse oder andere Probleme entwickelt haben, die man beheben muss.
Dieses Mal nahm ich mir Fleur vor - und entdeckte Risse am modellierten Behang an den Beinen.
Das hier ist "Fleur de Givre" (Eisblume), ein älteres Cust, Remaker ist mir unbekannt:
Fleur
Ich fand es schon immer unstimmig, dass sie gehairt ist, aber der Behang an den Beinen modelliert wurde.

Als ich vorsichtig eine Skalpell-Klinge unter den ersten Riss hakte, erlebte ich eine Überraschung- der vermutlich aus Efaplast bestehende Beinbehang ließ sich ablösen wie ein Gipsverband.
Hier mal an den Vorderbeinen zusehen:
Fleur
So sah das dann aus:
Fleur

Alle Viere freigelegt:
Fleur

Und dann, an einem Vorderbein, der Beweis- da sind noch Haare dran:
Fleur
Fleur war also mal komplett gehairt! Und das wird sie bald auch wieder sein.
Zunächst arbeite ich ihre Beine aber ein bißchen aus, denn dann fällt das Haar nachher realistischer.
Fleur

Fortsetzung folgt!

English Summary:
Fleur's surprise!
Pictured you see "Fleur de Givre" ("Iceflower"), an older remake, who created her I do not know, the lady I got her from some years ago also didn't know her maker.
Recently, when I did my spring check up on my vintage customs, I found she had cracks on the sculpted feathers on her legs.
I had always wondered already, why somebody would sculpt feathers on a haired horse or, the other way round, would not also replace the hair with sculpted mane and tail.
I took a sharp knife and prodded one of the cracks- it ran down and I could fold the sculpted mass back as if it was a medical cast cut open! So I went over all four legs and had the sculpted stuff pried loose within minutes. And one one frontleg, I found rests of hairs - my proof that she has once been fully haired. And soon she will be again, I just need to finish detailing and prepping her lower legs and then I will give her mohair feathers.
To be continued!

Sonntag, 13. März 2011

Nachtrag

Nachdem ich viel zu tun hatte, dann krank war und wieder einiges um die Ohren hatte, haben sich hier so einige Bilder angesammelt, die nun nach und nach in den nächsten Einträgen auftauchen werden.

Fangen wir mal an- von Diana habe ich diese Zwei zum Geburtstag bekommen.
Eselchen "Grisu":
Grisu

Und Friesenhengst Prins:
Prins

Prins

Er hat sich auch gleich mit Shorty angefreundet.
companions

Demnächst geht es dann weiter mit
Percy
percy wip

Hyacinth
hyacinth wip

Und Fleur- die eine Überraschung für mich hatte. *g*
Fleur

English summary:
Back after long absence! I had much to do at first, then got sick, but now I am back to posting and soon commenting, too.
But boy I have lots of piccies and posts to write, kinda a backlog. They will come up the next days.
I start here with two cute birthday pressies that I got from Diana, the little donkey "Grisu" and the Schleich Friesian "Prins". Prins immediately made friends with his new companion "Shorty".
New posts and piccies are coming about Percy, Hyacinth and... Fleur, who had a surprise in store for me, LOL!!